
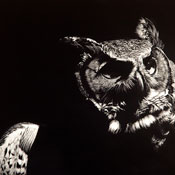
 Kate's Owl |
 Night Totem |
|---|---|
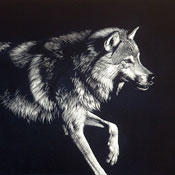
 Shadow Stalker |
 Pursuit |
ABOUT SCRATCHBOARD
Julie T. Chapman
What it is
A professional artists’ scratchboard has three layers. The base is a rigid wood-product board; over that is a layer of fine, pure white kaolin (porcelain) clay. On top of the clay is a thin layer of matte black india ink.
I create my scratchboard artworks by first transferring my working composition to the board with transfer paper; this gives me the basic outlines of my subject to guide the scratchwork. I then scratch through the black surface with a variety of tools, making tens of thousands of tiny marks to reveal the white clay underneath; my primary tool for most of the work is a fine-point xacto knife.
With scratchboard, the artist works in light rather than dark - the exact inverse of pen-and-ink art. Only very minor mistakes - one or two scratches out of place - can be corrected, so I need to be extremely attentive while working. Since every scratch reveals white, the depth of scratch will not give me more white. If I want an area of bright white, I need to make a large quantity of scratches in that area to remove the black ink - very time-consuming work!
How to handle it
When I receive the scratchboard from the supplier, the ink layer is delicate and easily marred (I wear gloves while working on the board). However, once I’ve finished the artwork, I seal the surface with several coats of professional artists’ matte fixative. This renders the ink surface much tougher, and it then becomes more difficult to scratch the board further.
The surface could still be damaged by someone attacking it with force (or a fork), but if you handle it with the same care you would an oil painting it should be fine.
Framing it
I don’t use glass in the framing because it would diminish your ability to enjoy the fine scratchwork, and glass is not necessary to protect the scratchboard surface.
If you are worried about protecting the board (e.g., from pets, zombies, or careless relatives), then by all means consider non-glare glass in the framing.
 Open Sunday through Saturday 10 am - 5 pm, every First Friday of Month open until 8 pm.
Rowe Gallery • Tlaquepaque Shopping District • 336 SR 179 Suite A-102 • Sedona, Arizona 86336
928-282-8877 • fax 928-282-8878 • kenrowe@rowegallery.com